One of the things I like about Steel Beasts ProPE (SBProPE) is that
it forces you to think really hard about tactics. The virtual
battlefield in SBProPE is fast and brutal and the only way to survive
is to get serious about what you are doing with your tank.
This
scenario I'm writing about today is part of the older scenarios in
SBProPE. It features a platoon of M1 Abrams defending objective "Star"
in a sector two kilometers wide or so. The enemy, a motorized rifle
company is advancing from west to east.
The OPORD in this
scenario is more like a FRAGO, which is correct I guess given the size
of the scenario. In the FRAGO, the commander of blue forces orders us
to avoid the enemy getting to objective "Star". The commander also has
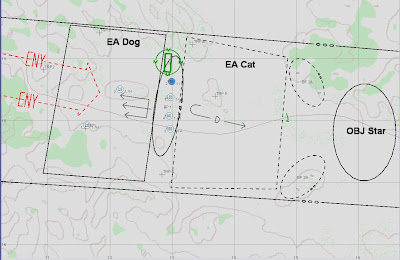
provided some maneuver and tactical guidelines which are depicted in
the next map as operational graphics.
Two
recon HMMWVs are in front of blue forces as combat patrols and will
provide warning of the approaching enemy. Our M1 Abrams tanks are
supposed to inflict as many casualties on the enemy by firing from
battle position 1 (BP1) towards engagement area "Dog" (EA Dog). On
order, we are to withdraw towards battle positions BP2A and BP2B under
the cover of artillery-delivered smoke and destroy the remaining enemy
forces in engagement area "Cat" (EA Cat).
Simple, uh?
Not quite.
For
starters, the scenario is about using tanks, intrinsically offensive
weapons, in a defensive role. The British military theorist J.F.C.
Fuller, in his "The Foundations of the Science of War", suggested that
the basic three actions of combat are: move, strike and protect.
According to Fuller, in a typical weapon system, each of these actions
influences the other. One soldier cannot fire (strike) as precisely
when he is running (move). In addition, if the soldier is running
(move), his cover (protect) is reduced. The tank is not exempt from
these factors, yet it has a superior mobility (move) that can be used
with little compromise of its firepower (strike) and protection against
enemy fire (protect). The ability to "move strike and protect" at the
same time constitutes the biggest advantage the tank has over other
weapon systems. Renouncing to move your tank, as you would do in a
defense scenario like the one detailed above, is giving away one
advantage. And since the "move, strike and protect" factors seem to
combine synergistically, loosing one of three is loosing much more
than1/3 of your capabilities. Just staying alive in such conditions
requires mastery and study. When tanks stay put in the battlefield with inexperienced crews inside, bad things happen.
FM 17-15 (Tank Platoon) has a whole chapter devoted to defensive operations. In chapter 4 there is this important paragraph:
The two patterns described in FM 100-5 are mobile and area defenses. A mobile defense is executed to destroy the attacking force by permitting the enemy to advance into a position that exposes him to counterattack by a mobile reserve. The focus of area defenses is on retention of terrain; defending units engage the enemy from an interlocking series of positions and destroy him, largely by direct fires.Since in this scenario we lack a mobile reserve, in this scenario we will be conducting an area defense.
I played this scenario with some gentlemen from a very well-known simulation community. The identities of the players are withheld to protect the innocent. :) All tanks in the platoon manned by humans except for tank #3, which was handled by the computer. I played as commander of tank #2.
Our platoon commander decided to go as the FRAGO suggested: stay in BP1, inflict some damage, call for an arty smoke mission and reverse to the alternate battle positions.
We never got a chance.
The enemy attacked our right flank (yes, the flank I was holding) and overran my position. When we detected the enemy tanks, they were at a shouting distance from my position. The call for artillery-smoke from our commander was too late as the enemy was already near our position. The enemy moved to the back to our position and took my tank, then tank #1. Tank #3 got destroyed while it was trying to reverse towards safety. Tank #4 made an heroic attempt to eliminate the fast moving enemy tanks. He took 2 of them with him.
The mission went catastrophically bad.
Below are my thoughts on why I think we failed.
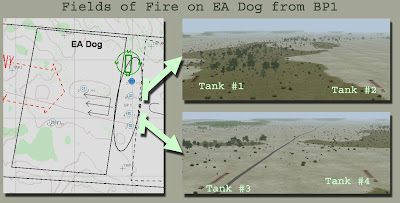
- The prepared dug-in firing positions at BP1 had good fields of fire on EA Dog. Good but not optimal.
 Click
the image for an expanded view. Left: map, showing our initial
positions. Right column: birds-eye view from BP1 towards EA Dog. Note
the prepared tank positions in front of each tank. Tank #3 and #4 had
good overlapping fields of fire, but tanks #1 and 2 were separated by a
small elevation covered by a patch of vegetation and they ended up with
different views of EA Dog.
  A
close up of the individual positions of tanks #1 and #2. Note the
slight elevation that separates both, which resulted in non-shared
fields of fire.
 - The withdrawal route from BP1 to BP2A and BP2B had no cover or concealment. We should have realized that if the artillery-delivered smoke would fail its purpose (as it did), the withdrawal towards the alternate BPs would have exposed us to enemy observation and fire.
 The
arrow indicates my withdrawal route, which featured terrain flat as a
pancake. The thing in front of my tank is a prepared dug-in tank
fighting position.
The
arrow indicates my withdrawal route, which featured terrain flat as a
pancake. The thing in front of my tank is a prepared dug-in tank
fighting position.A bit off topic, I want to mention that my tank took 8 hits during this mission. The 9th was the charm ...
 The red rods indicate the direction of the munition hitting my tank.